


 For
For


 .
.


 .com
.com


Installing Heater To Wall (Cont.) Mounting Heater To Floor
1. Locate two bottom mounting holes. These holes are near bot- tom on back panel of heater (see Figure 12).
2. Mark screw locations on wall.
3. Remove heater from mounting bracket.
4. If installing bottom mounting screws into hollow or solid wall, install wall anchors. Follow steps 1 through 4 under Attaching To Wall Anchor Method, page 9.
If installing bottom mounting screw into wall stud, drill holes at marked locations using 9/64" drill bit.
5. Replace heater onto mounting bracket.
6. Place spacers between bottom mounting holes and wall anchor or drilled hole.
7. Hold spacer in place with one hand. With other hand, insert mounting screw through bottom mounting hole and spacer. Place tip of screw in opening of wall anchor or drilled hole.
8. Tighten both screws until heater is firmly secured to wall. Do not over tighten.
Note: Do not replace front panel at this time. Replace front panel after making gas connections and checking for leaks (see pages 11 and 12).
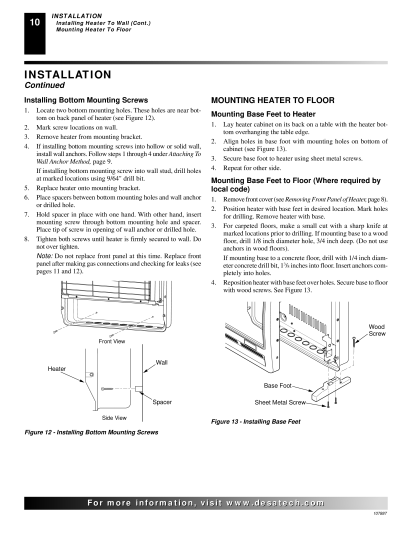
1. Lay heater cabinet on its back on a table with the heater bot- tom overhanging the table edge.
2. Align holes in base foot with mounting holes on bottom of cabinet (see Figure 13).
3. Secure base foot to heater using sheet metal screws.
4. Repeat for other side.
1. Remove front cover (see Removing Front Panel of Heater, page 8).
2. Position heater with base feet in desired location. Mark holes for drilling. Remove heater with base.
3. For carpeted floors, make a small cut with a sharp knife at marked locations prior to drilling. If mounting base to a wood floor, drill 1/8 inch diameter hole, 3/4 inch deep. (Do not use anchors in wood floors).
If mounting base to a concrete floor, drill with 1/4 inch diam- eter concrete drill bit, 1 3 / 8 inches into floor. Insert anchors com- pletely into holes.
4. Reposition heater with base feet over holes. Secure base to floor with wood screws. See Figure 13.
Sheet Metal Screw
For..com
Vanguard Heating offers a range of innovative heating solutions, including the VP16T, VP22IT, VN18T, VP16IT, and VP26 models. Each of these heaters is designed to provide efficient and reliable warmth for various spaces, making them suitable for both residential and commercial use.
The VP16T model is known for its compact size and powerful heating capabilities. It features an adjustable thermostat that allows users to maintain their desired temperature effortlessly. Designed for energy efficiency, the VP16T operates with minimal energy consumption while delivering consistent heat output. Its lightweight construction makes it easy to move and install in different areas as needed.
The VP22IT model expands on the VP16T's features, incorporating advanced technology for improved performance. It comes with a built-in timer function, allowing users to program their heating schedule. This feature enhances energy savings and convenience, as the heater can automatically turn on or off based on individual preferences. Additionally, the VP22IT includes a safety shut-off mechanism that activates in case of overheating, ensuring safe operation.
The VN18T is designed for versatile applications, featuring multi-directional airflow for optimized heating distribution. It is equipped with robust heating elements that provide quick warmth in a matter of minutes. This model is particularly popular for larger spaces due to its high heating capacity. The VN18T also includes a user-friendly digital control panel, making it easy to adjust settings.
The VP16IT combines the strengths of its predecessors, integrating smart technology for enhanced user experience. It features Wi-Fi connectivity, allowing users to control the heater remotely using a smartphone app. This model also supports voice command integration, making it compatible with smart home systems. Its sleek design adds a modern touch to any environment.
Lastly, the VP26 model offers the highest heating output among the Vanguard lineup. Tailored for large areas, it incorporates a dual-zone heating system that optimizes performance based on room size and heating requirements. Its advanced thermal insulation technology minimizes heat loss, contributing to efficiency and reduced energy costs.
In conclusion, Vanguard Heating's selection of VP16T, VP22IT, VN18T, VP16IT, and VP26 models features innovative technologies, safety measures, and user-friendly controls. These heaters are engineered to provide effective heating solutions that prioritize efficiency, convenience, and safety, making them a top choice for consumers seeking reliable warmth in any setting.